Understanding and Using Your Right Edge Putt Tracker
Putting on your Right Edge Putt Tracker
Putting Overview
Putting on your Right Edge Putt Tracker is simple. With the device on and waiting (amber LED illuminated), once you have started a putting session (practice, challenge, or multiplayer challenge) in the application, simply:
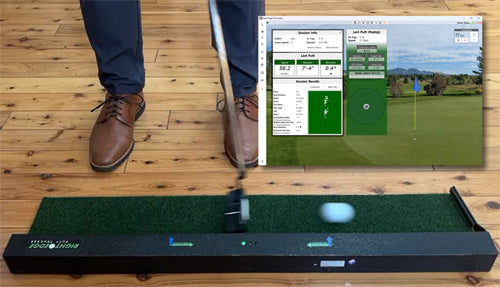
1. Place a ball in front of the arrow corresponding to the direction that you putt (see below). The device will detect the movement in front of the start position and switch into watching mode, indicated by illumination of the green LED.
2. Within 30 seconds, strike your putt as you are putting on a real green.
3. Upon recognizing your putt, or the 30 second timeout expiring, the device returns to waiting mode, indicated by illumination of the amber LED.
Right-Handed Putting
| Orientation | Start Location |
| |
 |
Left-Handed Putting
| Orientation | Start Location |
 |
Additional Notes
- The Putt Tracker device expects you to putt right-handed or left-handed based on the setting established for the golfer profile set to putt in the application.
- Thirty (30) seconds after recognizing movement in front of the start arrow and entering watching mode, if no putt is observed, the device goes back to waiting mode with the amber LED illuminated, and any putt will not be recognized. To re-enter watching mode, simply move the ball around a little bit in front of the start arrow and watch for the green LED to illuminate.
- While you can
Video Demonstration
Notice how when the ball is moved into position for a right-handed putter, the device goes into watching mode, indicated by the green LED becoming illuminated.
The "Your Target Distance" profile setting
Understanding the "Your Target Distance" Profile Setting
When you strike a relatively flat putt, and your intention is to make the putt (as opposed to lagging a putt), ideally you will strike the putt at a speed where which the ball will roll some distance beyond the cup. You're not trying trying to strike it so that it rolls just far enough to barely make it to the cup. There is no right distance, but typically, the distance you should be aiming for is somewhere between 12in-18in beyond the cup.
In the Right Edge Putt Tracker application, you set your preferred target distance - represented as the distance beyond the cup that you want to target - when you create your golfer profile.

Now, in your session results summary view, the dashed line behind the cup in the summary illustration represents your target distance, and performance summaries regarding distance utilize that as your target distance.

This is especially helpful for golfers who leave too many putts short, but it's helpful to keep anyone focused on their correct target distance when practicing.
Session Type: Practice Session
Practice Sessions with Your Right Edge Putt Tracker
Practice sessions are the foundation on which your putting improvement is built with your Right Edge Putt Tracker.
Once you've installed, completed your initial setup with your Putt Tracker device, and created your golfer profile, it's super easy to get right into a practice session upon starting up the Right Edge Putt Tracker application.
Simply select your golfer profile, and then select "Practice Session" from the next, Session Selector screen, and you will be brought to the practice Session Info screen.

Clicking the Session Setup button opens the screen where you can configure your practice session, while clicking the Start Session button starts the practice session by a) verifying the connection to the device; b) readying the device for the putting; and finally c) displaying the current Session Info display.
Session Setup
The Session Setup screen is where you configure your practice session.

Besides changing the profile of the golfer who will be practicing, you can adjust the following aspects of the practice session:
Distance to Cup
When the Auto/Randomized toggle is OFF, adjust the slider to to the distance you would like to practice, then all your putts will be to a cup at that distance.
When the Auto/Randomized toggle is ON, you're presented with a range selector where you set a minimum and maximum cup distance, and then the application will randomly select a new cup distance for you after each practice putt.
Green Speed (Stimpmeter Value)
Use the slider to set the stimpmeter green speed on which you would like to practice. You can select a speed from 7 to 14. If you are unfamiliar with stimpmeter values as they relate to green speed, the higher the number, the faster the green, and generally:
- Less than 8.0 is considered slow
- 8.0 - 9.0 is slow/medium
- 9.0 - 10.0 is medium
- 10.0 - 11.0 is medium/fast
- 11.0-12.0 is fast
- greater than 12.0 is very fast
If you want to learn more about the stimpmeter, see this quick-read article from Golf Monthly.
Auto-Start Metronome
This option will only display if the currently selected golfer profile is configured to utilize the metronome feature, and when toggled on, the metronome will automatically start and stop with the practice session itself. Note: You can always manually start/stop the metronome.
Session Info Display
Upon clicking the Start Session button, and the device has been readied for putting, the Session Info display is activated. The Session Info display is broken into two sections; Last Putt and Session Results.

Last Putt Section
After each putt in the session, this section is updated to indicate the speed (inches per second), rollout distance, and direction (angle, relative to center) of the last putt that you struck.
Session Results Section
As you continue to strike putts in the current session, this section updates to provide information about all the putts attempted during the session. From here you can access an ordered list of your session putts, various summary statistics for the putts in the session, and a visual display depicting either a plot of your putt results, or depicting your average putt result with standard deviation bars for rollout distance and direction.
For more detailed information about the session results display, see the Reading the Practice Session Summary View section below.
Session Type: Individual Challenge Session
Challenge Sessions with Your Right Edge Putt Tracker
While practice sessions are the foundation on which your putting improvement is built, challenging yourself is how you bake in and transfer the improvements you gain through practice to real results (lower scores).
On the course - playing actual rounds of golf - is obviously the most optimal form of challenge for baking in and transferring your improvements to real results, but your Right Edge Putt Tracker can help with that too.
The Right Edge Putt Tracker application has built-in putting challenges where it provides you with a preset number of putts/holes, and scores your putting in various ways. This not only forces you to execute a variety of putts, but the added element of scoring naturally induces another level of challenge/pressure that is more like putting during an actual round of golf compared to striking practice putts.
At the time of this writing, the Right Edge Putt Tracker application includes four built-in challenges [each in three (3) and nine (9) hole lengths]:
- Stroke Play
- Ladder Drill
- Made-Putts Train
- Two-Putts to Win
See challenge summaries below for more info and instructions on each challenge type.
Starting a Challenge Session
Just like with practice sessions, simply select/load your golfer profile (if you didn't select your golfer profile on startup, select the "Load Golfer..." option from the main menu), but then choose "Challenge Session" from the Session Selector displayed after loading a new golfer profile, and you'll get the Challenge Session Setup view.
When you select the challenge you want to do from the drop down, a summary/explanation of the challenge is shown, as well as any settings that are applicable to the challenge.
| Initial View | With Challenge Selected | |
 |
 |
Clicking "Select Challenge and Return" will select the challenge and take you to the Selected Challenge view. From there, clicking "Start Challenge" initiates the session start sequence (validates connection with device, readies device for putting), renders the challenge progress/results view, and you simply follow the instructions on the screen for the challenge, and the application will track and maintain your score.

Challenge Summaries
Challenge Summary: Stroke Play
A basic stroke (or medal) play challenge where you fully putt out(*) on a given number of random-length putts, and you try to complete the challenge in as few putts as possible.
Challenge Summary: Ladder Drill
For this challenge, the golfer is presented with progressively longer putts (cup distances), and they are given one attempt to make the putt. A lower score is the goal, and scoring is determined as such:
Made putt: -1
Leave within 2 feet: 0
Leave at 2 feet or more: +1
Cup Distances
3-hole edition: 3', 3'-6", 4'
6-hole edition: 3', 4', 6, 8', 10', 12'
9-hole edition: 3', 4', 5', 6', 7', 8', 9', 10', 12'
Challenge Summary: Made-Putts Train
For this challenge, the golfer is presented with progressively longer cup distances, they fully putt out(*) on each, and the lengths of the putts they made on each are totaled to form their score.
For example, if the 3-hole edition is chosen, and it plays out like this:
1: 3' to cup, putt is made: 3' added to score
2: 5' to cup, putt is missed with 8" remaining: Gimme putt 8" added to score
3: 7' to cup, putt is missed with 2'-5" remaining
4: 2'-5" to cup, putt is made: 2'-5" added to score
The total score (made-putt train): 3' + 8" + 2'-5" = 6'-1"
Cup Distances
3-hole edition: 3', 5', 7'
6-hole edition: 3', 3'-6", 4', 6, 8', 10'
9-hole edition: 3', 3'-6", 4', 5', 6', 7', 8', 9', 10'
Challenge Summary: Two-Putts to Win
This challenge is meant to test your ability to make sure you can 2-putt (or better) longer putts while under pressure, and so try to imagine you're on the final hole of a match or tournament, and you need a two-putt to win. The golfer is given a number of random-length, longer-range (between 10-20 feet) putts, and the goal is to not leave yourself a knee-knocking, 2' or longer, must-make putt to win.
Scoring is simply +1 for a leave inside of 2' (including a made putt), 0 for a leave at or outside of 2', and high score is goal (perfect score = number of holes/putts in the challenge).
(*) Note: Maximum number of putts is three (3), and a remaining distance inside 2 feet is taken as a "gimme."
Reading the Practice Session Summary View
Reading the Practice Session Summary View
Once you're a few putts into a practice session, there's suddenly a lot going on in the session summary view, and it can seem overwhelming. There is a lot of insightful data and visual information about how you're putting, and we'll explain it here so that you can use it to become a better, more consistent putter.
![]()

Practice session summary view.
The numbers associated with Putts, Made, Short, Left, and Right are probably self explanatory, so we'll skip those. As for the rest, here is a quick description of what these numbers are telling you:
Avg Distance: This is the average distance to the cup of the putts in this session.
Short, Too Short, and Too Long: At Right Edge, for the purpose of analyzing and helping you understand your putting, we introduce and utilize the concept of "too short" and "too long." This is because simply tracking short and long (relative to the cup, or your target distance) by themselves is mostly meaningless. You actually want your putts to be long - BUT, you don't want them to be too long, so we track that. You never want your putts to be short at all (especially when putting inside about 15'), so we track that for you - BUT, it's especially problematic when they are too short.
So how do we define too short and too long? If the roll out of your putt was short or long of the cup by 36" or more, we consider the putt too short/long. While no putt length, - OK, outside of 6" maybe - is truly a "gimme," at about 36" is where the odds of missing take a relatively sharp turn upwards. Basically, when you leave yourself a > 36" to the cup, that's where the risk of a three-putt becomes real - And as you know, three-putts are one of the worst things you can do for your score.
Avg Rollout Delta: This is the average difference (delta) between your target distance and all session putt rollout distances. For example, in the summary view above, the golfer is, on average, coming up 8" short of their target distance in the current session.
Ideally, of course you want your average rollout to be right on your target distance, in which case your average rollout delta would be 0" - But this number by itself doesn't tell you much about our putting (you could have blown one past your target distance by five feet, then come up short by five feet, and your average rollout delta would be a stellar 0"). But, combined with the rollout delta standard deviation....
Rollout Delta Std. Dev: This is the standard deviation of the differences (deltas) between your target distance the putt rollout distances of your putts in the current session. This value is an indication of your distance control consistency. The smaller this number is, the more consistent have been your putt rollout distances in the session. Consistency is obviously something we want, so the lower the better with this number.
Avg Direction: This is the average roll-angle/direction (relative to the line to the middle of the cup) of your putts in the current session.
Direction Std. Dev: This is the standard deviation of the roll-angles (relative to the line to the middle of the cup) of your putts in the current session. Just like the Rollout Delta Std. Dev described above, this is a measure of your consistency, but in this case it's a measure of your directional consistency. The lower your directional angle standard deviation, the more consistent are the roll angles of our putts.
Visual Summary: To the right of the data is a visual representation of your average putt rollout location (based on your average roll-angle and distance relative to target), along with bars that represent your standard deviations, or put another way, your consistency around your average.

When practicing, your goals should be:
1) An average rollout position exactly at your rollout target.
2) Standard deviation bars to as short as possible.
Perfect putting would result in simply a grey dot right on top of your rollout target.